Showing posts with label diy. Show all posts

Tuesday, June 23, 2015

MAKE: 5 Ways to Indigo Tie-Dye, The Shibori Method

Shibori is one of the earliest known Japanese fabric dying techniques. It is a form of tie dying, also called resist dying. The manipulations of the fabric prior to application of the dye are called resists, as they partially or completely prevent the applied dye from coloring the fabric. There are countless ways to bind, bunch, fold or wrap your cloth in preparation for the dye bath, all producing different pattern results. I checked out a few books from the library (this one was especially helpful) and read up on the art before diving into this DIY, which I recommend. It felt good to have a little bit of knowledge on the subject since it was pretty new to me. 

The first step is to gather your materials. This takes a few days so I recommend planning ahead. After doing a little research online, I settled on buying this kit from Amazon, which worked great and I highly recommend! It makes the process very straightforward and inexpensive. It basically comes with everything you need absent a 5 gallon bucket and a stir stick. I did end up buying a few extra things at the Dollar Store and Ace Hardware, but if you don't want to fuss with all the different techniques you can really do a lot with this little kit. In terms of the fabric pieces I used, I wanted to start easy so I bought some flour sack tea towels, a set of cotton pillowcases and a top from Target. I also had a white dress I got on sale at Old Navy so I threw that in too! It felt a little risky but I'm glad I did it. When picking things out just make sure you are choosing natural fibers and not synthetic materials. 

MATERIALS:
- 5 Gallon bucket with an air tight lid
- Stir stick
- White fabrics for dyeing

Optional
- Extra gloves (they only give you one pair in the kit and they are not the best, a little flimsy and they don't go past your wrists. Next time I am going to get something like this so my hands don't end up blue for a week!)
- Wooden pole or maillot
- String
- Scissors
- Marbles
- Extra rubber bands
- Tongs
- Notebook and pen (to document your patterns and results)
- 2 gallon bucket (for the water dip, this is necessary if you don't have a sink near your work space)
- Plastic tablecloth or drop cloth
This DIY takes several hours, so I'd set aside most of the day if you have it. Shibori is not meant to be rushed. Your pieces will not turn out well if you are in a hurry. I suggest waking up early, setting up your work space, and putting on some good tunes. Since I don't have the luxury of having a yard (I live on the 4th floor of my apt complex), I had to improvise a bit with my 'work space'. I picked a shaded spot by the corner of my building, laid down a drop cloth (which was actually a plastic table cloth from the dollar store), filled one 2 gallon bucket with warmish water, and set the other 5 gallon bucket out for my dye bath. If you have a sink nearby you won't necessarily need to 2 gallon bucket for water, but I didn't want to have to be running up and down the stairs so this was my solution. 
Making the Indigo dye bath: The kit has thorough instructions on how to make the dye bath, so if you follow them carefully you should be good to go. That being said, this was definitely the most intimidating part for me. The dye is sensitive and is not supposed to be exposed to oxygen, so just remember not to slosh or splash around. Stir in a gentle, steady motion to avoid introducing oxygen into the liquid in this phase (it can ruin the whole process). Once you have made the bath, it needs to sit for at least 30 min (an hour is recommended) so at this point you can use this time to fold, bind and tie your fabric. 
Shibori Techniques:
If I can offer any tips at all for this part I would just say go for it. There is no right or wrong way. This is the fun part, so don't dwell too much on how things might turn out. Photo documentation is helpful. I took a picture of the before and after of every piece so now I pretty much know how to get similar results in the future. Also jotting things down in a notebook and sketching beforehand is a good way to go once you get more familiar with the results you will get. I definitely felt like I was winging it a little, this being my first time, but I was really pretty happy with my results! Mistakes can often be beautiful in this art which is a major bonus :)

1. Itajime: aka Accordion Fold technique. Numbers 1. and 3. both use the triangle accordion fold technique. This was a super simple and quick folding technique that involves folding the fabric forwards and then backwards (like an accordion) making pleats in the fabric and then doing the same in a triangle shape. Here is a video example. Number 5. also uses this technique except for instead of folding it into a triangle I continued with a square pattern. This is a good video example for this technique. You may use wooden blocks or claps to secure your shape, but just keep in mind that anything covering the fabric is going to be white underneath. I just secured mine with a couple rubber bands. See below for results.

2. Arashi: aka, the Pole Wrapping method. See number 2. The term arashi is the Japanese word for "storm" which seems fitting for this method producing chaotic designs on a piece of cloth. This was one of the fastest and easiest methods in my opinion. Here is a good video (if you are a visual person like me). Basically you just lay your cloth diagonal to the pole, wrap it around, and secure it with a bunch of string. If you want a more linear patten, make sure not to cross the string, but I was aiming for a random design. See below for visuals and results. 
3. Ne-Maki: aka Bound Resist, circle method. Used in number 6.-- this technique involves placing marbles on the fabric (you can also use rocks, or even just bunch the fabric) and securing them with rubber bands. The rubber band creates a beautiful circular pattern. See below for visuals and results. 
4. Kumo: or Spiderweb method. this technique takes a little time but the results are beautiful. It involves randomly tying areas of fabric in place with ties (you can use yarn, string, plastic, wire, rubber bands etc.) in a cone or horn. I used this technique for number 4. I randomly gathered fabric, tied it at the top and wrapped it down. I did this in several places throughout the piece. It produces a beautiful spiral. See below for results.

{Match the numbers from the previous pic to the corresponding numbers in this picture to give you an idea of the techniques and finished results}
Once you have bound and bundled and done all you need to do to your fabric to produce beautiful patterns, you are ready to start dyeing! You must soak all of your fabric in warm water first and then one at a time place your pieces into the indigo bath. Make sure to stir your bath and remove the 'bloom' before your start. All of this is explained in the kit instructions. During this phase it is very important not to just drop your piece into the dye bath and let it sink to the bottom. Using your hands or tongs, gently submerge it just under the dye surface, making sure not to introduce oxygen into the bath (no splashing, hold very still). I put each piece in the bath for at least 3 min. When removing your piece wring it out underneath the surface and try to avoid as much dripping as possible. Place your piece on the drop cloth and let it oxidize for about 20 min. You will notice that at first the piece is a greenish yellow color, but slowly begins to turn indigo blue as it is exposed to the air. Repeat this process as many times as you'd like to achieve desired results. (I did it 3 times just to ensure a deep blue indigo color)

Now that you have dyed all of your pieces, let them dry completely in the sun, and then wash in cold water  to set the dye. Take pictures and label your results so you can do it again, even better next time! I'm so pleased with this DIY. You really can't go wrong with tie dye and learning the traditional Shibori technique is very cool if you ask me! Happy dyeing!

Monday, November 3, 2014

Welcome, November + Halloween.

Hello, lovely folks! It's been a long time, I know. When our home computer crashed back in the spring it pretty much killed my urge to blog on the regular. I was sneaking it in, rushing to get posts completed, and, honestly, the whole thing started to feel like a burden. I never want that for this space. The short hiatus turned into a leisurely vacation, I'll admit. So much time has passed that the seasons have changed....twice (where does the time go?). So, it really only makes sense to start right here, right where we are -- the weekend after Halloween, the 3rd day of November. 

This time of year always feels pretty crazy. So many holidays, back to back to back. When one is over, it's almost a sigh of relief. I definitely feel that way about Halloween this year. We dressed up and went to a party, but we didn't make it a weekend affair like we have in years past. One night and a handful of pictures was good enough for me. I also decided to keep it simple with the costume, grabbing most of it from my closet and filling in the rest with makeup and accessories. I have to say though, it turned out alright. Rob was a ringmaster and I was a gypsy. Side by side, we really made it work, if I do say so myself! Here's a look:
The good news is....we finally scraped up enough money to replace our computer and a brand spanking new one is arriving this week! It feels good guys, it feels really good. So hopefully you will be seeing more of me :)

Friday, June 20, 2014

MAKE: Mint Ginger Lemongrass Syrup

Simple syrup is one of those things that you make once and wonder why you've never done it before. It is soooo easy, and I guarantee you always have the ingredients on hand. It's a 1:1 measurement. Water to sugar. That's it. And once you've nailed that, the variations are endless....which is how I found myself making this recipe.

Is the sight of neglected, browned herbs in your fridge a familiar one? For me, I would say most definitely yes. I'll keep half a bunch of basil thinking "I'll do something with it". Nope. I come to find it weeks later looking very sad at the back of the fridge. Good news guys, this recipe can do wonders for that problem!

In this particular case, I had leftover lemongrass and ginger from various dinners I cooked last week, and a huge bunch of mint that I grabbed randomly from the asian market once again thinking, "I'll do something with it". And you know what?...I DID! Obviously you can omit any of these flavors to make an even simpler syrup but I thought these would go nicely together as a threesome. I didn't really measure my herbs so this is kind of a guesstimate recipe….


Ingredients: Makes 4.5-5 cups 
(this is a large batch recipe, I recommend cutting the sugar, water ratio down if you are only using it for one purpose)
3 cups water
3 cups sugar (I used one cup of turbinado sugar, two cup granulated)
bunch of mint
1 inch piece of ginger, chopped
1 stalk of lemon grass, chopped thin
MAKE:
In a medium saucepan combine sugar, water and herbs and bring to a boil over medium heat. 
Stir until sugar is completely dissolved.
Allow mixture to cool.
Strain the mixture and discard herbs. 
Pour into a sealed container, glass jar or bottle.

* If you are new to the world of simple syrup and would like a few suggestions on how to use it, here are a few of my favorites:

- add sweetness to iced or hot tea

- Make a fancy cocktail, a Mojito or Mint Julep would be perfect for this recipe

- Popsicles! Mix fresh fruit, syrup and some water or juice, blend, and you have your next popsicle creation 

Tuesday, December 10, 2013

MAKE: Felted Acorn Ornaments

Materials:
Wool Roving 
Felting Pad or Sponge
Acorn Caps
Thread 
Drill and 1/8 in Drill Bit
Glue Gun and Glue

The wool roving can be found online or at your local craft and supplies store. For you Denver folk, Fancy Tiger has a lovely selection of colors. Probably the hardest thing about this project is finding the acorn caps. I looked far and wide for mine back in the fall. If you do go on the hunt here are some basic tips: there are quite a few varieties acorns but they always grow on Oak trees-- to learn more about identifying Oak trees and the types of acorns that might be falling in your area this field guide is very helpful! Or just take a walk...you might get lucky, the best time for seed collection is during the months of September and October! And of course you can buy them online too, because we have everything at our fingertips these days, but what's the fun in that?! Unless it's 5 degrees and the ground is frozen--then you have an excuse.
MAKE:
Start by rolling the wool roving into a ball, this should be a shape similar to the size you'd like your acorn to be but don't worry too much about this because you can reshape it once you start the felting process. Using your felting needle work into the wool until it starts to harden and form shape. This video is ever so helpful if you are not very familiar with needle felting and also does what pictures can't in terms of seeing the whole process from start to finish. Once you have your beautiful felted acorn bottom you need to find its acorn cap mate! Before assembling the acorn, drill a small hole into the top, loop a piece of string through and secure with a knot-- cut off any excess string with scissors. Push the acorn into its cap and finish shaping if necessary. Remove the cap and add a bit of glue. Done! 

I like to make several in my favorite fall colors and put them on the tree as a set. They also serve as festive decoration if you want to skip the last few steps and just sprinkle them on your Christmas table, place them in a bowl, or use them to wrap presents

Friday, May 17, 2013

MAKE: Bleached Oven Mitts


You can never have enough oven mitts laying around in my opinion. I am pretty sure I have about three different sets in my kitchen right now. I love this little craft project because a bleach pen is a great way to add a unique design to any solid fabric. I got the idea from my Design Sponge at Home book that demonstrates the same technique on tea towels. So go crazy and be creative!

Materials:

A set of solid oven mitts any color
Newspaper or paper bags
1 bleach pen
pencil and sketch pad (optional)
rubber gloves

MAKE:

Lay down newspaper or paper bags to protect your work surface. 
Sketch out your design beforehand on some paper if desired
Lay the solid mitts down on your work surface and draw your pattern on the fabric with a bleach pen
Let the finished oven mits set for 1 hour
Wearing rubber gloves to protect your hands rinse the mitts in cold water.
 (make sure all the bleach is rinsed off to avoid smearing)
Let the mitts dry fully before use.


Thursday, April 25, 2013

MAKE: Easy Drop Biscuits

Sometimes toast just doesn't do it for me. I want something flaky and buttery with my eggs! I love these biscuits because they are made from ingredients you most likely already have in your kitchen. A few weeks ago I combined them with gravy for a quick and easy biscuits and gravy. And they aren't just good for breakfast-- they are a fantastic substitute for rolls at dinner too.

Ingredients:

3 cups of all-purpose flour
2 tbsp. baking powder
1 1/2 sticks of butter (cold and cut into small pieces)
1 3/4 cups of milk
pinch of salt
fresh herbs, like rosemary or sage (optional)
melted butter, to brush on top (optional)

MAKE:
Preheat oven to 400 degrees F.  
Place the flour, baking powder and salt in a food processor and pulse a few times to combine.
Add the butter (and fresh herbs if you have them on hand) and pulse until ingredients are combined.
Slowly add the milk through the top opening and pulse simultaneously. 
 Once the dough starts to come together it is ready, do not over mix.  
Drop hefty spoonfuls of the mixture onto a greased baking tray. 
Bake for 20-25 min.
Once they are golden brown, remove from oven.
Brush with melted butter after you they are done if desired!
Makes 12-15 biscuits.


Friday, February 22, 2013

MAKE: Jam Jar Candles.

I was in the mood to do something crafty last weekend but not in the mood to go shopping for a bunch of supplies and spend money. So I rounded up a few things I already had and this was the result. You can never have too many candles in the house and I am one of those weirdos who keeps glass jars around because I like to use them for storage. I had the wax leftover from making candles over Christmas, which is a really fun and easy gift too! So here is how it's done:

Supplies:

- 1 glass jar (I used a Bonne Maman Raspberry Jam jar)

- 1 container of natural wicks

- Soy candle wax

- 1 paint pen, for decoration (optional)

- essential oils, for smell (optional)

Using a double boiler (or one lg pot and one medium pot if you don't have one of those fancy things) heat about two inches of water in the lg pot and bring to a boil. In the medium size pot place as much wax as desired (depending how many candles you want to make) and turn the burner to down medium-low heat. After about 10 minutes or so the candle wax should be melted. Do not let the wax temperature exceed 250 degrees F! Turn off the heat and let the wax cool for a couple minutes. Next, if desired, put a few droplets of your scent in to the wax and mix. Finally pour the wax into preferred container and place wick in the center*. Let the candle dry for about 2 hours and decorate the jar with a paint pen or any other materials you may have!

* The trickiest part of this whole process for me was keeping the wick centered. I could have used one of these but rigged up something similar with toothpicks and tape.

Monday, October 29, 2012

DIY: Fantastic Mr. Fox Halloween.

It's hard to know where to begin here, but I'll try. It started with an idea, as most Halloween costumes do, and this web post I found. I have been wanting to be Felicity Fox from Wes Anderson's Fantastic Mr. Fox since the movie came out, and because this year I figured there would be a lot of this, I decided to go for it. After a quick discussion with Rob, who immediately agreed to be Mr. Fox, we were on our way...

I googled several mask options, some easier than others. But in the end, we decided to go all in and do the full face mask. We weren't sure how we'd pull it off or if we would pull it off, but we'd sure try! A trip to JoAnne's fabric, followed by three full nights of crafting later, and voila! we had our masks. Wow, that made it sound so easy. In reality and I hate to say this because I do feel like it was worth it...these babies took a lot of glue gun blisters, sweat, and screaming matches to get to the final result. I seriously hesitate even doing a tutorial because I am not sure if anyone will actually 'do it themselves', but I will. If anything just to show you how crazy we really are.

So here it goes...

Materials:
Thin cardboard (from a cereal box, or in our case, a beer box)
duct tape
hot glue gun (lots of extra glue sticks!)
baseball hat (with the brim cut off)
1 bag of poly fiber fill
1/2 egg carton
1 styrofoam nose shape
2 fake leaves (optional)
2 yards of while fur fabric
1 square of black felt
1 tube of acrylic paint (color: Burnt Sienna)
1 sponge brush
1 black pom-pom


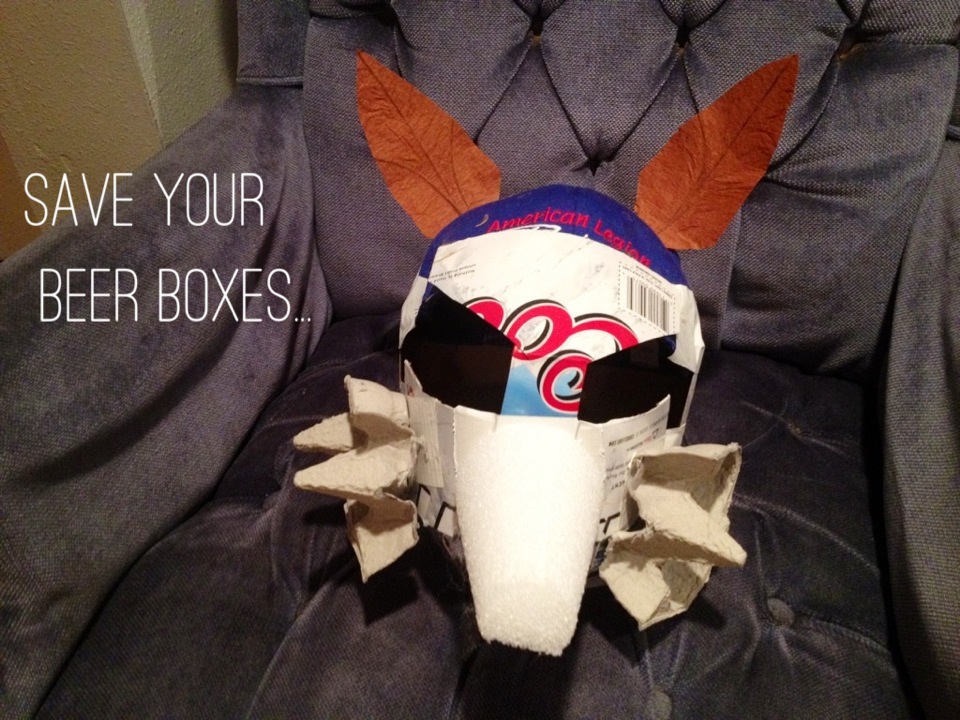
1. Make the mask 'skeleton' by using the baseball hat as the top of your head, and the thin cardboard as your face. This is a lot easier with two people because for the most accurate fit you should measure the cardboard pieces with your mask on. We made one piece that went from the brim of the hat to the nose, a large piece that went from one cheek, around the back of the neck, to the other cheek, two smaller pieces that made the eyes a little more almond shaped (not pictured) and one rectangular piece above the mouth connecting the cheek and nose piece. Make sense? Probably not, huh. I kind of wish I would have taken photos of the stencils we made but we weren't sure any of this was going to pan out at the time so I didn't. My bad.

2. Next cut the 1/2 egg carton in half once more and place on the sides of your mask where your cheeks will be. Hot glue to hold. Then get your styrofoam nose shape and cut about 1 1/2 inch off the top and cut the bottom so it is flat  (my shape was rounded and too long so I had to make these adjustments). Finally cut the fake leaves into more of an ear shape and fasten with hot glue. You can also use cardboard for this step which is what Rob did...I just kinda wanted to try the leaves because I bought them...

2.  After that, cover the parts you want to bulk up with the poly fiber fill and duck tape over. We filled in the cheeks and the back of the ears. Using the duct tape completely cover the cloth cap (we did this because we found the hot glue stuck to the duck tape much easier than the fabric for the next step)

3. Then cut out six panel pieces of white fur fabric to align with the head (we copied the 'baseball hat' model and just modified the back pieces to fit around the ears) and hot glue onto mask. In one strip, cover the eyes, edge of nose and edge of cheeks (this strip will look kinda like this and is best done by first placing a rectangle piece of fabric, holding it in place with tape or small pins and tracing the eye holes, remove the fabric, cut the holes and secure with hot glue). Next cover cheeks, nose, ears and the rest of mask with white fur. Try to use as many full pieces as you can. A lot of choppy cuts will make it look sloppy.

4. Now that the the white fur is completely covering the mask, it's time to paint. I tried to mimic the look of a fox by keeping the bottom half of the face and the ears white. We watered down the paint in order to get a less concentrated color and used a sponge brush for application. The paint will drip so be careful to set the mask on something like an old sheet or a box, and watch the bottom to make sure it is not dripping onto the white fur part.

5. Finally it's time to add the finishing touches! (yay, you are almost done). Cut eyebrows and eyelashes (if you are a Mrs.) out of a piece of black felt. Using a Sharpie, draw around ears (Rob used a Sharpie for his eyebrows which you can do too if u want). Fasten black pom-pom onto the end of the nose using hot glue. AND NOW YOU ARE DONE!!!
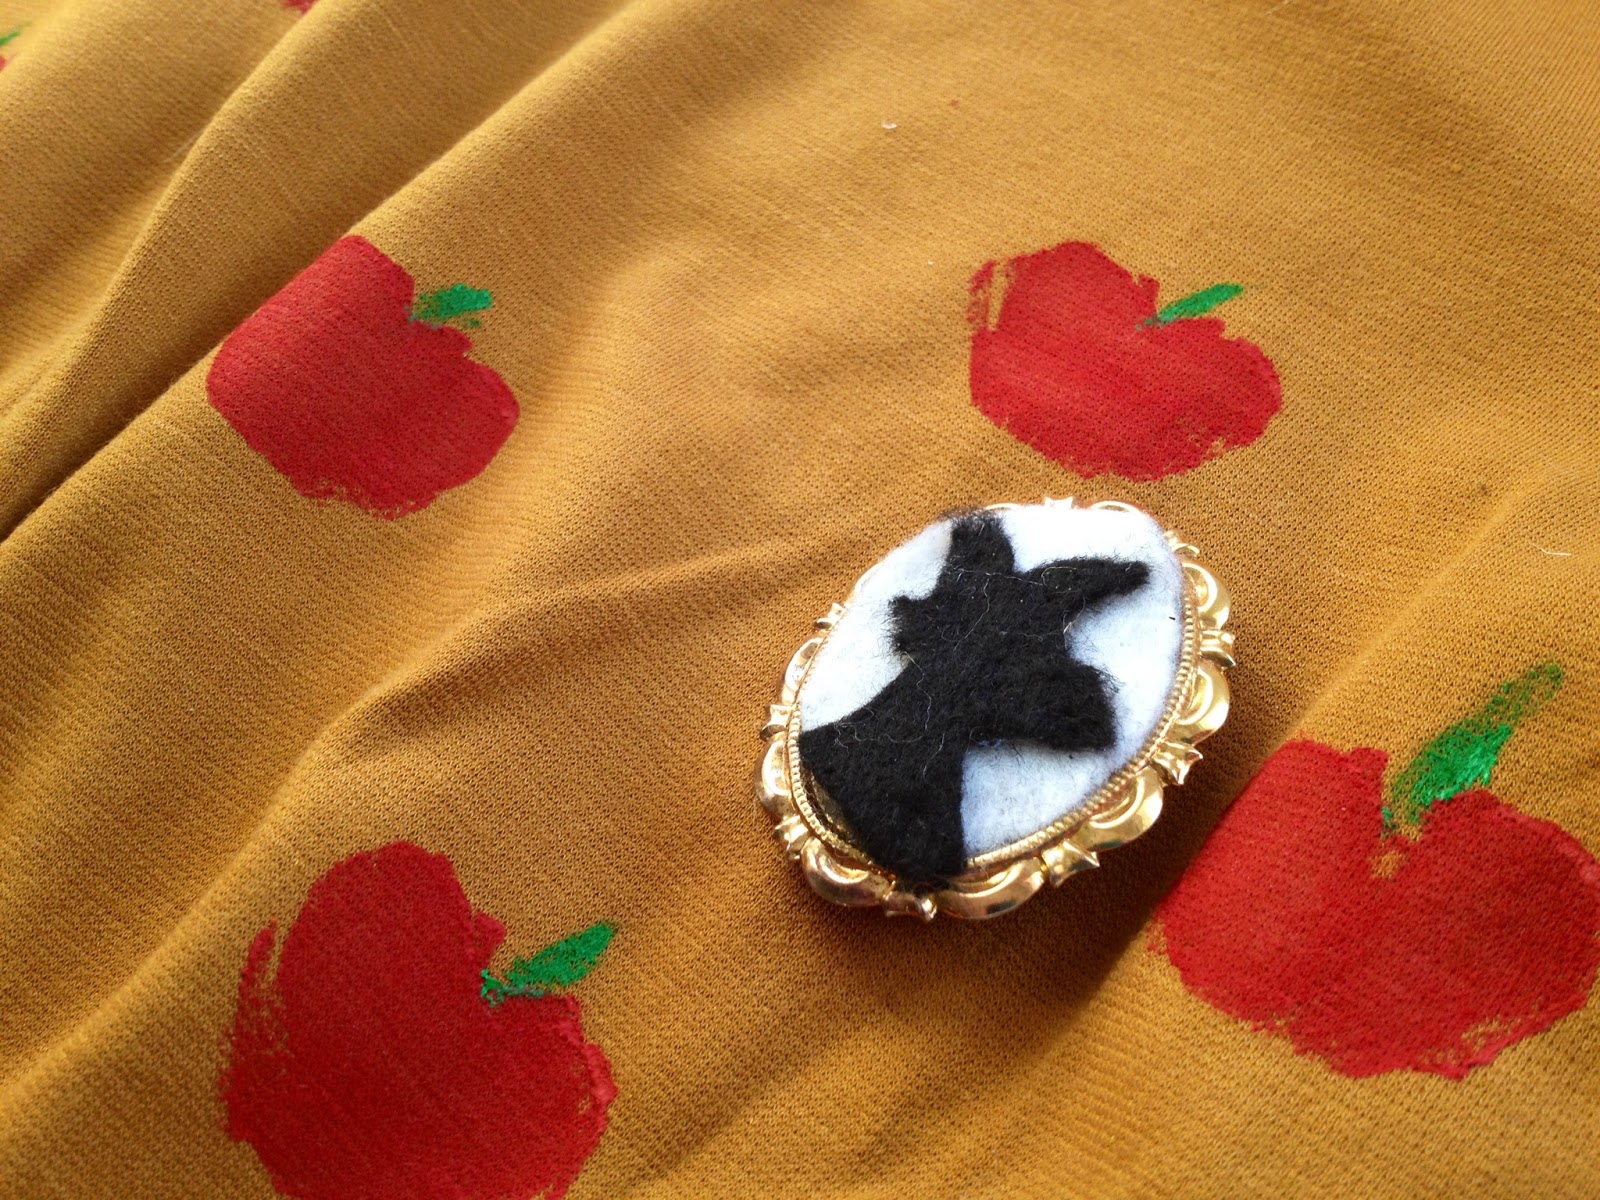
I did a couple more things to finish off my costume including stamping apples on my dress (p.s. I found the dress at Target), with a potato stamp. I made a red apple shape, covered the whole thing and then hand painted each little green stem on. I also made the brooch out of a vintage cameo brooch I found at the thrift store for 3 dollars. I simply just popped off the old cameo and felted on a new one. For the bottom part, I wore red tights and wedge oxfords. After a lot of hard work, my cussing fantastic costume was complete! I will definitely have more pictures to share tomorrow of the full head to toe look and photos of Rob and I dressed together but this is surely plenty for now! x. 

Tuesday, October 23, 2012

Tasty Tuesday: Homemade Condiments- Arugula Pesto + Classic Tomato Sauce.


If our CSA taught me one thing, it was this: when you have an abundance of a particular vegetable, make condiments. It is a terrific way to preserve the life of your vegetables and keep the waste to a minimum. Also, who doesn't love homemade jars of pesto and tomato sauce lying around the house? Bonus: they make wonderful gifts! For a few weeks we were getting pounds of arugula...yes pounds and I was desperate not to see it thrown in the trash. The great thing about pesto is it's so versatile. You can basically substitute any leafy green and whatever nut you'd like...the combinations are endless! Thus, our Arugula Pesto was born....well more like discovered. The arugula adds a lovely peppery taste that is to die for and we used walnuts instead of pine nuts to save a little $. Yep, it turned out super tasty. Hint: add a touch of grated lemon rind for a tiny bit of citrus flavor....

Arugula Pesto
adapted from Simply Recipes

2 cups of packed arugula leaves, stems removed**
1/2 cup of shelled walnuts
1/2 cup fresh Parmesan cheese
1/2 cup extra virgin olive oil
6 garlic cloves, unpeeled
1/2 garlic clove peeled and minced
1/2 tsp. salt
a pinch of gratedlemon rind (optional)


1. Heat 1 tsp of oil in a small skillet over medium heat. Toss in 6 garlic cloves with their peels still on and cook until slightly browned, about 10 min. Remove from pan, cool and peel skins off

2. Toast the walnuts in the same small skillet, adding a bit more oil of necessary, until browned. About 5 min.

3. In the food processor, combine arugula, roasted garlic (plus 1/2 a clove of raw garlic), toasted walnuts, parmesan cheese and salt and pepper. Pulse these ingredients while drizzling in olive oil through the top gradually. (Note: I don't usually measure the olive oil, I kind of just eyeball it. I prefer my pesto to be thick and not too oily but it's a matter of taste so you may want to pour the oil in slowly and stop and give it a taste from time to time)

** Do not skip this step, leaving on the stems on will cause a bitter, unpleasant taste 

Cooking, for me, is a lot about overcoming small fears. I'm just going to say this...and you don't have to believe me, but peeling tomatoes is really easy....and actually sort of fun. I too had doubts but seriously, once you do it one time you will see, it's not so bad. This recipe lets the ingredients speak for themselves and that's why I love it. It's a classic Italian traditional tomato sauce. No fluff. Also If you have any trouble or just need more reassurance, there is this video on blanching tomatoes that I found really helpful. 

Classic Tomato Sauce
from Food52

2 pounds fresh, ripe tomatoes, peeled (see video for guidance, link above)
5 tablespoons butter
1 medium onion, peeled and cut in half
Salt to taste
1. Place the prepared fresh tomatoes in a saucepan, add the butter, onion, and salt, and cook uncovered at a very slow, but steady simmer for about 45 minutes, or until it is thickened to your liking and the fat floats free from the tomato.
2. Stir from time to time, mashing up any large pieces of tomato with the back of a wooden spoon. Taste and correct for salt.

Tuesday, October 25, 2011

A craving: Chicken Pot Pie...

It's comfort food season alright. Last week I woke up with a craving for pot pie. I've never made one and there isn't a recipe in my family, so, of course, I looked to the trusty internet for guidance. After browsing several recipes, I liked this one because it had just the right kinda goodness in it-- lots of chicken, yummy veggies and a creamy, buttery sauce. I decided to poach my chicken but you could easily skip that step by buying a rotisserie. I also decided not to make the crust from scratch (gasp); instead I used refrigerated biscuits because of time. I think someday when I'm feeling a bit more ambitious I'd like to make my own but the biscuits worked out just perfectly. This recipe would work great in small individual ramekins as well but I opted for the full dish because that's what I had on hand.
Okay, so I'm not trying to toot my own horn here but this was so fantastic (maybe it was all that butter??). I don't think any one of us had a speck of food left on our plate. Seriously, it's that good.
Chicken Pot Pie
adapted from Annie's Eats

Filling Ingredients:

+ 3 tbsp. salted butter
+ 1 yellow onion
+ 1 lg or 3 small russet potatoes, diced
+ 3 cloves of garlic, minced
+ 8 oz (1 carton) button mushrooms, sliced
+ 1/2 tsp. crushed red pepper
+ 2 cups frozen peas and carrots
+ 3 lg chicken breasts
+ 3 1/2 cups of chicken broth
+ salt & pepper for seasoning

Sauce Ingredients:

+ 8 tbsp salted butter
+ 1 cup flour
+ 1/2 cup heavy cream
+ Dash of hot sauce
+ salt & pepper for seasoning

Crust Ingredients:

+ 1 pkg of Pillsbury Golden layer flaky biscuits

Directions:

Poach the chicken by placing it in a pot that's just large enough for one layer. Pour the chicken stock over chicken (make sure it completely covers the top of the chicken by at least 1/2 an inch). Add a pinch or two of salt and pepper. Bring to a boil. Once boiling, reduce heat to a simmer. Partly cover the pot and cook for about 10 min. Turn off heat and cover completely, let the chicken cook for 10 more min in liquid. Remove chicken and shred into small pieces. Set aside the chicken broth for the sauce.

For the filling, melt the butter in a large skillet over medium heat. Add the onion and potatoes, saute for about 5 min. Mix in garlic and mushrooms and cook for about 15-20 min (or until potatoes are tender). Once vegetables are cooked, add the shredded chicken and frozen peas and carrots and let cook about 2 min more. Stir in red pepper flakes and salt and pepper to taste.

For the sauce, melt butter over medium heat in saucepan. Add flour and whisk until smooth. Using the chicken stock from the poaching step, whisk in flour mixture until it becomes the consistency of cream soup. Mix in the cream, hot sauce and salt and pepper to taste.

Next assemble the casserole by pouring the filling in a large baking dish. Next, pour the sauce over the filling and stir to combine well. Lay the biscuit rounds on top of the filling (you may want to flatten the biscuits a bit to fill more surface area) and brush the tops with egg white if desired. Place the pot pie in a 375° F preheated oven and cook for 30 min until bubbly. Serve & Enjoy!

** FYI: The dish in the photos is from night 2 (leftovers are the best) and is smaller than the original one I cooked the pot pie in...which was 13in x 9in.

Friday, November 6, 2009

Have a lazy weekend!


hello dears! What are you up to this fine weekend? I am planning on ceasing these beautiful sunny days and spending some time outdoors! Nothing jotted down in my calendar or anything, which is how I like to spend my weekends, laid back and lazy. Hope you are doing the same. I feel like the last couple of months of the year can get pretty stressful, so taking time to yourself can be very important. Have a lovely next couple of days! x

Here are somethings to help you procrastinate...

feeling the grown up growing pains...

This film is setting style trends!

DIY! A cute little knitting project.

Fast and yummy recipes: here, here and here


Woodland homes.


gorgeous hankies!

moody blues here, here and here

Retro goodness (via bloesem)

The purchaser of this product must go to many swanky parties!

This yummy hot winter beverage got me top prize in our annual holiday cocktail competition!

So, so cute!

ruby daydreams...